Multiple languages
WriteADoc supports internationalization and managing documentation in multiple languages out of the box.
Setting the language
To set your documentation language, use the lang argument with a language code ("en" for English, "es" for Spanish, "fr" for French, etc.). English is the default, so you don't need to set it explicitly.
docs = Docs(
    __file__,
    pages=pages,
    site={
        "lang": "es",
        ...
    },
)
This language will be used for two things: translating the few hardcoded strings in the views, and fine-tuning the search so it works better.
For a very small list of languages — Danish (da), German (de), Spanish (es), French (fr), Italian (it), and Portuguese (pt) — this will be done automatically. But don't worry if yours is not in the list, because it's very simple to add support for a new one.
Making the search aware of your language
WriteADoc uses Lunr.js for searching without an external service. If your language is not included with WriteADoc by default, you must
download the lunr.[YOUR LANGUAGE].min.js support file from here.
For example, for Korean, you would download the file lunr.ko.min.js.
Save the file to assets/js/.
You might want to delete the files already there for languages you are not going to use.
Working with multiple languages
WriteADoc supports having documentation translated into multiple languages. To do so, follow this procedure:
1. Set the default language
First, set the default language, the language of the main documentation, as before:
docs = Docs(
    __file__,
    pages=pages,
    site={
        "lang": "en",
        ...
    },
)
2. Create a subfolder for the content of each language
Inside the content folder, create a subfolder for each translation. For example, to support Spanish and Italian, in addition to the default English:
content/
  ├── es/
  │     └── welcome.md
  ├── it/
  │     └── welcome.md
  │
  └── welcome.md
3. Create instances of WriteADoc for each language
Now create a separate instance of WriteADoc for each extra language and collect them in the variants dictionary of your main instance:
docs_es = Docs(
    __file__,
    pages=[ "welcome.md", ... ],  # Relative to content/es/
    site={ "lang": "es", ... },
)

docs_it = Docs(
    __file__,
    pages=[ "welcome.md", ... ],  # Relative to content/it/
    site={ "lang": "it", ... },
)

docs = Docs(
    __file__,
    pages=[ "welcome.md", ... ],
    variants={
      "es": docs_es,
      "it": docs_it,
    },
    site={ "lang": "en", ... },
)
The keys of the variants dictionary will be used as a prefix added to every URL of the generated documentation for each language.
Each version will also be generated into the build/{prefix} folders, so your build folder will look like this:
build/
  ├── es/
  │    ├── docs/
  |    |      ├── welcome/
  |    |      |       └── index.html
  |    |      └── index.html  # redirects
  │    ├── search/
  |    |      └── index.html
  |    |
  │    └── index.html
  |
  └── it/
  │    ├── docs/
  |    |      ├── welcome/
  |    |      |       └── index.html
  |    |      └── index.html  # redirects
  │    ├── search/
  |    |      └── index.html
  |    |
  │    └── index.html
  |
  ├── assets/
  ├── docs/
  |      ├── welcome/
  |      |       └── index.html
  |      └── index.html  # redirects
  ├── search/
  |      └── index.html
  |
  ├── index.html
  ├── robots.txt
  └── sitemap.xml
One home page
You can skip generating a home page for each language by using the option skip_home=True
in each language instance.
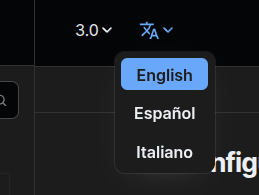
4. Enable the language selector
Finally, you need to enable the language selector.
Go to the file views/language_selector.jinja and remove
the {# at the beginning and the #} at the end, so the selector appears in your documentation.
In the same file, add your languages to the list using the keys in the variants dictionary from the last step,
as URL prefixes:
<div class="language variant-popover">
    <button type="button" tabindex="0">...</button>
    <div class="popover" role="menu">
        <div>
            <a href="/" {% if site.lang == "en" %}class="selected"{% endif %} tabindex="0">English</a>
            <a href="/es/" {% if site.lang == "es" %}class="selected"{% endif %} tabindex="0">Español</a>
            <a href="/it/" {% if site.lang == "it" %}class="selected"{% endif %} tabindex="0">Italiano</a>
        </div>
    </div>
</div>
That's it, you can now switch between languages in your documentation.

Translating hardcoded strings
If your documentation is in more than one language, and you add text hardcoded in your views (meaning, not coming from the markdown files),
you need to add translations for it in all of your languages.
The translations for those are located in the views/strings.json file.
{
  "en": {
    "_": "English",
    "DOCUMENTATION": "Documentation",
    "SOURCE_CODE": "Code",
    "HELP": "Help",
    "MENU": "Menu",
    "BACK_TO_TOP": "Back to top",
    "ON_THIS_PAGE": "On this page",
    "PREVIOUS": "Previous",
    "NEXT": "Next",
    "SEARCH": "Search",
    "SEARCH_RESULTS_FOR": "Search results for",
    "NO_RESULTS_FOUND": "No results found",
    "COPY": "Copy",
    "COPIED": "Copied",
    "COLOR_SCHEME_SELECTOR": "Color scheme selector",
    "SWITCH_TO_DARK_MODE": "Switch to dark mode",
    "SWITCH_TO_LIGHT_MODE": "Switch to light mode",
    "SWITCH_TO_SYSTEM": "Switch to system preference",
    "NOT_THE_LATEST_VERSION": "This is not the latest version of the documentation.",
    "CLICK_TO_GO_TO_LATEST": "Click here to go to latest"
  },
  // ...
Remove all the languages you don't need.
In your views, instead of the text, use the variable like this:
<button>{{ _('MENU') }}</button>
This will use the value for "MENU" in the language of the page.
You can also add translations for URLs or paths of images, videos, etc. Or you can use the site.lang attribute instead:
<video href="myvideo_{{ site.lang }}.mp4"></video>